DTF on Hats & Caps: Curved Surface Press Hacks | DTF Dallas
Jun 23, 2026
DTF on Hats & Caps: Curved Surface Press Hacks
Pressing DTF transfers on a flat shirt is straightforward. Pressing them on a curved cap crown is where most people run into trouble. This guide covers the techniques, cap types, and press settings that get clean, durable adhesion on hats without ruining transfers.

In This Article
Why the Curve Is the Problem
A flat heat press platen delivers even pressure across a flat surface. A cap crown is curved, so a flat platen only makes full contact at the center, leaving the edges of the design under-pressed. Under-pressure is the number one cause of DTF adhesion failure on caps. The transfer center bonds while the edges lift, peel, or crack after the first few washes.
The goal with any curved-surface method is the same: get even, firm pressure across the entire design footprint, not just the high point of the curve.
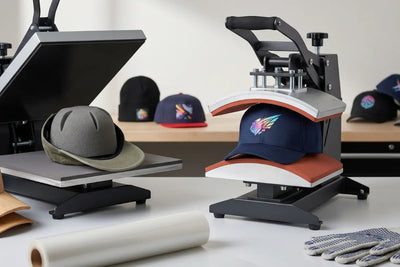
Two Methods That Work
1. Dedicated Cap Heat Press
A cap press has a curved lower platen shaped to match a cap crown and a curved upper element that closes over it. This is the most reliable method for structured caps because pressure stays even across the full curve. If you press caps in any volume, a cap press is the correct tool.
2. The Stuffed Crown Method
If you only have a flat platen, you can improvise. Stuff the cap crown firmly with a dense foam insert or a rolled towel so the front panel pushes up into a flatter, tighter surface. A firm pressing pad placed between the cap and the flat platen distributes pressure more evenly across a slight curve. This helps on low-profile caps and unstructured hats but is not sufficient for structured high-profile cap crowns.
Cap Types and What Works
- Structured baseball caps (6-panel, high profile): Require a dedicated cap press or the stuffed crown method. The rigid buckram lining in the front panel holds the curve firmly. Designs over 3 inches wide need a cap press for full-edge adhesion.
- Low-profile structured caps: Less curve than a high-profile cap. The stuffed crown method is more effective here. Designs up to 4 inches wide can be pressed with good results using a dense foam insert.
- Unstructured caps and dad hats: The soft, unstructured crown flattens more easily under a flat platen. These are the most forgiving cap styles for DTF without a dedicated cap press. Press with a foam insert inside, designs up to 4 inches.
- Snapbacks (flat bill): The bill is flat, which is an advantage. Brim designs on flat-bill snapbacks can be pressed on a flat platen without the curve problem. The crown still requires a cap press or foam insert for crown designs.
- Beanies: A flat platen with a foam insert inside the beanie works well. Beanies are flexible and conform to the foam insert during pressing. For a full walkthrough of beanie-specific settings, DTF Printing for Hoodies covers the stretch and temperature variables specific to knit fabrics.
Press Settings for Caps
Cap fabric varies by style, but most structured caps use cotton twill, polyester twill, or a poly-cotton blend.
DTF Dallas Standard Cap Settings
Temperature: 290 to 310°F
Pressure: High Pressure 6 sec / Medium Pressure 8 to 15 sec
Peel: Hot Peel
Treat these as your starting point and test on your specific cap fabric before a production run.
For polyester-dominant caps, test at the lower end of the 290 to 310°F range to reduce dye migration risk. Pressure setting depends on your press type: medium-firm on a cap press, firm when using the foam-stuffed flat platen method.
Cap presses apply pressure differently than flat platens. Verify your cap press is calibrated to deliver consistent pressure across the full platen contact area. Under-pressure on a cap press produces the same adhesion failures as pressing with a flat platen.
For polyester-dominant caps, the temperature range follows the same dye migration logic as athletic jerseys and performance wear. Optimal DTF Heat Press Settings Guide covers the variables that apply across all polyester cap constructions.
Design Placement on Caps
Front center panel: The primary placement. Designs here hit the flattest portion of the cap crown. Standard sizing: 2 to 3.5 inches wide for structured caps, up to 4.5 inches for low-profile or unstructured styles.
Side panels: The curve is more pronounced on the side panels. Keep side-panel designs small (under 2.5 inches) and use a cap press for reliable adhesion.
Back panel: Common for secondary branding. The back panel on adjustable caps typically has a closure (snapback strap or Velcro) that must be folded or removed before pressing. Some closures are heat-sensitive. Check before pressing a back-panel design.
Brim (underside): Occasionally requested for novelty or restaurant branding. Press brim designs on a flat platen. The brim lays flat when removed from the cap and pressed separately, then reattached if it is a removable brim.
The Peel on Caps
Hot peel on most cap applications. Structured caps retain heat in the fabric and buckram lining, giving you a comfortable hot peel window after the press opens. Peel promptly at a sharp angle, pulling the carrier film against the direction of the panel seam rather than across it.
For cap presses where the crown is loaded and pressed in one position, the peel direction follows the same sharp-angle rule. Hold the cap stable on the lower platen while peeling to prevent the fabric from pulling.
Post-Press Finish
After peeling, do a finishing press: place a silicone sheet over the applied transfer and press for 5 seconds. On caps where the initial press may have slightly less even contact than on a flat garment, the finishing press seats the transfer edges and improves adhesion uniformity.
For the full DTF pressing workflow including peel technique, Step-by-Step: Applying DTF Transfers Ready to Press covers the decision points that apply to curved-surface pressing as well.
Ordering Hat Transfers
DTF Dallas produces custom DTF transfers for caps, hats, and beanies sized to your specific placement dimensions. Same-day production on print-ready files before 2:00 PM CST. For multi-placement hat orders or team cap jobs, the gang sheet builder lets you configure multiple hat designs on one sheet before ordering.
Frequently Asked Questions
Can I press DTF transfers on caps without a cap press?
Yes, for low-profile, unstructured, and dad-hat styles. Use the stuffed crown method with a dense foam insert and a firm pressing pad on a flat platen. High-profile structured caps and designs wider than 3 inches need a dedicated cap press for reliable full-edge adhesion.
What temperature should I use for DTF on caps?
The DTF Dallas starting range is 290 to 310°F with a hot peel. For polyester-dominant caps, test at the lower end to reduce dye migration risk. Always test on your specific cap fabric before a production run.
Why are the edges of my cap design peeling after washing?
This is almost always under-pressure on the curved crown. A flat platen only contacts the high point of the curve, leaving the design edges under-pressed. Use a cap press or the stuffed crown method to get even pressure across the full design, then add a 5-second finishing press with a silicone sheet.
How big can a cap design be?
Front center panel: 2 to 3.5 inches wide for structured caps, up to 4.5 inches for low-profile or unstructured styles. Keep side-panel designs under 2.5 inches because the curve is more pronounced there.
Does DTF Dallas make transfers sized for hats?
Yes. DTF Dallas produces custom DTF transfers sized to your specific cap placement dimensions, with same-day production on print-ready files submitted before 2:00 PM CST.
Need Cap-Ready Transfers?
Order custom DTF transfers sized for your caps, hats, and beanies. Same-day production before 2:00 PM CST.
Order DTF Transfers
Comments 0
Be the first to leave a comment.