Stop Using Mockups: How to Take Stunning T-Shirt Photos with Just Your Smartphone
Nov 24, 2025 (Updated on Dec 12, 2025)
In the visually saturated world of online apparel, your product photos are everything. They are your digital storefront, your first impression, and the single most crucial factor in a customer's decision to click "add to cart." For years, new and budget-conscious brands have relied on digital mockups—a T-shirt template with a design photoshopped onto it. And let’s be clear: mockups have their place. They are fantastic for testing new ideas, gathering feedback, and running pre-orders without investing in physical inventory.
But if you are relying solely on mockups for your entire product line, you are leaving a massive amount of money and brand trust on the table. Today's savvy online shopper can spot a generic mockup from a mile away. It creates a subconscious barrier, a feeling of "is this a real business?" that can lead to hesitation and abandoned carts. Authentic, real-life photos, on the other hand, build an immediate connection. They show the true color and texture of the garment. They prove that you have a real, high-quality product in hand. They tell a story and create a brand identity. In short, real photos sell more shirts, and often, at a higher price.
The good news? You do not need a thousand-dollar camera and a professional studio to create these scroll-stopping images. The powerful camera you already have in your pocket is more than capable of producing stunning, professional-quality product photos. This is your definitive, step-by-step look at how to stop relying on mockups and start taking incredible T-shirt photos with just your smartphone. A great photo begins with a great product, and the stunning detail of a professional DTF transfer deserves to be shown off in all its real-life glory.
Setting the Stage for Smartphone Photography Success
Before you even think about tapping the shutter button, a little preparation will make the difference between an amateur snapshot and a professional photograph.
It Starts with a Flawless Canvas
This is the most important and most frequently skipped step. You must prepare the T-shirt itself. A wrinkled shirt is the number one sign of an unprofessional product photo. It screams "I pulled this out of a box and threw it on the floor."
- Steam is Your Best Friend: A simple handheld steamer is the best and fastest way to remove wrinkles from a T-shirt without risking the scorch marks an iron can leave.
- Iron with Care: If you must use an iron, turn the shirt inside out. Never, ever place a hot iron directly on top of a DTF transfer or any other kind of print, as it will melt and destroy the design. Use a low to medium heat setting suitable for the fabric.
- The Lint Roller: Once the shirt is wrinkle-free, give it a thorough pass with a lint roller to remove any stray threads, dust, or pet hair. You want a perfectly clean canvas.
Understanding Your Most Important Tool
Your smartphone's camera is incredibly powerful, but you need to know how to use its key features to your advantage.
- Clean Your Lens: This sounds obvious, but it’s amazing how many photos are ruined by a smudged, dusty lens from being in a pocket or purse. Before every shoot, take a microfiber cloth and give the lens a gentle wipe.
- Turn on the Grid: In your camera settings, turn on the grid lines. This will overlay a 3x3 grid on your screen, which is essential for using composition techniques like the rule of thirds.
- Master Exposure Lock: Have you ever tried to take a photo where your camera keeps making it too bright or too dark? Tap and hold on the screen where your T-shirt is. A little sun icon will appear, allowing you to slide your finger up or down to manually adjust the brightness and lock it in place. This gives you total control over the light.
Chasing the Perfect Light
The single biggest secret to beautiful photography is light. And the best light is almost always free, natural, and soft. Never use the built-in flash on your phone; it creates harsh, ugly shadows and washes out colors.
- Find a Large Window: The ideal indoor location for T-shirt photography is on the floor or a table right next to a large window that is not in direct, harsh sunlight. You want bright, but indirect, light. This creates soft, gentle shadows and reveals the true colors of your garment.
- Use the Golden Hour: If you are shooting outside, the best times of day are the "golden hours"—the first hour after sunrise and the last hour before sunset. The light during these times is soft, warm, and incredibly flattering.
- Embrace Overcast Days: A bright but overcast day is a photographer's dream. The clouds act like a giant softbox, diffusing the sunlight and creating perfectly even, shadow-free light everywhere.
Mastering the Top-Down World of the Flat Lay
The flat lay is the most popular and accessible style of product photography for apparel. It’s a simple, top-down shot of the T-shirt and complementary props arranged on a flat surface. When done well, it’s clean, informative, and highly effective.
The Classic Fold for a Professional Look
A clean, crisp fold is perfect for showcasing your T-shirt in a professional and tidy way.
- Lay the ironed shirt face down on a clean surface.
- Place a magazine or a rigid piece of cardboard in the center of the back, just below the collar.
- Fold one side of the shirt over the edge of the magazine. Fold the sleeve back over the part you just folded.
- Repeat on the other side, creating a neat rectangle.
- Fold the bottom third of the shirt up towards the collar.
- Carefully remove the magazine, and flip the shirt over. You should have a perfectly folded shirt with the top portion of your design clearly visible.
The "Styled" Lay for Personality and Vibe
For a more casual, "lived-in" look, you can skip the perfect fold. Lay the shirt flat, but create a few gentle, organic wrinkles or a casual tuck at the bottom. You can casually drape one sleeve over the body of the shirt. This style feels less like a sterile product shot and more like a glimpse into a real person's life.
The Art of Flat Lay Composition
How you arrange your shirt and props is what tells the story.
- Create a Narrative with Props: The props you choose should complement the design on the shirt and help tell a story about your ideal customer. For a T-shirt with a hiking theme, you could add a compass, a pair of hiking boots, and a thermos. For a coffee-themed shirt, add a bag of coffee beans, a favorite mug, and a croissant. The props add context and create a whole vibe.
- Use the Rule of Thirds: Turn on your camera's grid. Instead of placing the T-shirt dead center, try placing it along one of the vertical lines, or at the intersection of two lines. Place your props in other key areas of the grid. This creates a more dynamic and visually pleasing composition.
- Give Your Design Breathing Room: Don't cram the frame full of props. Negative space—the empty areas of your photo—is essential. It gives the viewer's eye a place to rest and draws more attention to your product.
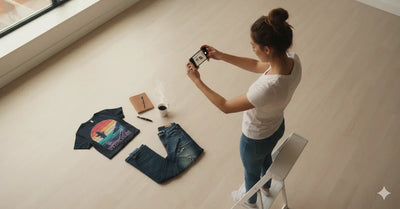
Getting the Perfect Overhead Shot
To get that classic, distortion-free flat lay look, you need to shoot from directly above.
- Avoid Casting Shadows: Pay attention to where your light source (the window) is. Position yourself so that your body and your phone are not casting a shadow over your flat lay. Often, this means having the light source to your side.
- Get High and Stay Parallel: You may need to stand on a sturdy chair or a step stool to get high enough to fit everything in the frame. The key is to keep your phone perfectly parallel to the floor. If you tilt it, the shirt will look distorted. This is where the grid lines are your best friend—make sure the lines of the grid are parallel with the edges of your background.
Bringing Your T-Shirts to Life with Lifestyle Photography
While flat lays are essential, lifestyle photos—showing the T-shirt on a real person—are arguably even more powerful. They answer the customer's most important question: "What will this look like on me?" They create an emotional connection and help the customer envision themselves wearing your brand.
You Are Your Brand's Best Model
You do not need to hire professional models. In fact, using yourself, your friends, or your family can often feel more authentic and relatable. All you need is a simple, inexpensive smartphone tripod and the self-timer function on your camera. This allows you to set up your shot, start a 3 or 10-second timer, and get into a natural pose without needing anyone else to take the photo.
Posing and Styling for Authenticity
The key to a great lifestyle shot is to look natural, not like a stiff mannequin.
- Focus on Movement and Interaction: The best poses are often not poses at all. Take photos while you are in motion: walking towards or away from the camera, leaning against a textured wall, adjusting your sunglasses, or interacting with a prop like a coffee cup or a book. These candid-style shots feel much more authentic.
- Style the Shirt: Show the versatility of your product. Take some shots with the shirt worn normally, some with the sleeves cuffed, some with a casual front-tuck into a pair of jeans, and some with the bottom tied in a knot. This helps customers see how they can incorporate the shirt into their own personal style.
- The Power of Detail Shots: Don't just take full-body shots. Get closer. Take a shot from the waist up. Take a close-up of the DTF print itself to show off the quality and detail. Take a shot that highlights the texture of the fabric. These detail shots are fantastic for building a high-end brand perception and are perfect for a product page image gallery. The quality of a DTF Dallas print holds up beautifully even in close-ups.
Using Portrait Mode for a Professional Touch
Most modern smartphones have a "Portrait Mode." This feature uses software to intelligently blur the background of your photo, creating a beautiful "bokeh" effect that makes your subject pop. This instantly mimics the look of a photo taken on an expensive DSLR camera with a fancy lens. Use it for your model shots to create a professional, polished look that separates your subject from the background.
The Final Polish: Simple Smartphone Editing
Shooting a great photo is 90% of the battle. The final 10% is a quick, simple edit to make your photo look its absolute best. You don't need Photoshop; your phone's built-in photo editor or a free app like Snapseed is more than powerful enough.
The Goal of Editing is Realism
Your primary goal, especially when selling a product, is to enhance, not deceive. You want the edited photo to look like the product does in real life, but on its best day. Pay special attention to the color of the T-shirt; make sure your edits don't change a "mustard yellow" shirt into a "lemon yellow" one.
The Three Essential Adjustments
Almost every great photo can be achieved by mastering just three simple sliders.
- Brightness (or Exposure): Most photos benefit from being a little brighter. Increase the brightness to make the whites look clean and the overall image feel bright and airy.
- Contrast & Sharpness: Increasing contrast makes the darks darker and the brights brighter. A small boost can make your design pop. A touch of sharpness can make the details of your print look extra crisp. Don't overdo it, as it can look unnatural.
- White Balance (or Warmth/Temperature): This is the key to accurate colors. If your photo looks too yellow or too blue, adjust this slider until the whites in the image look like a true, neutral white.
Your Smartphone Photo Field Guide 📸
-
What is the best free app for editing T-shirt photos?
- While your phone's native editor is often powerful enough, a great free option is Snapseed (by Google). It offers precise control over brightness, contrast, and white balance, and includes a "healing" tool that is perfect for removing a stray piece of lint you missed before the shot.
-
How do I deal with a design that has a slight glare or sheen in the photo?
- This is usually caused by direct, harsh light hitting the print. The best solution is to change your lighting. Move away from the direct sunlight and into a spot with bright, but indirect, light. Shooting on a slightly overcast day is also a perfect way to eliminate all glare.
-
Is it better to have more flat lay photos or more lifestyle photos on a product listing?
- The best strategy is a mix of both! Lead with your strongest lifestyle photo to create an immediate emotional connection. Follow it with a clean flat lay that clearly and accurately shows the full design and color of the shirt. Then add a few more lifestyle and detail shots to round out the gallery.
Create Photos as Real as Your Brand
The era of hiding behind generic digital mockups is over. By embracing the power of your smartphone and understanding the fundamentals of light, composition, and simple editing, you can create a stunning and authentic visual identity for your brand. Real photos build real trust, attract real customers, and are the foundation of a profitable and sustainable apparel business. You have the tool in your hand and the knowledge to get started.
Your photography is now as authentic as your brand. Let's make sure your prints are, too. Create apparel with the stunning detail and true-to-life color that your new photos deserve.
Comments 0
Be the first to leave a comment.