The Science of Under-Curing vs. Over-Curing Your Transfers
Dec 19, 2025 (Updated on Dec 22, 2025)
Welcome to the heart of Direct-to-Film (DTF) printing—the critical moment where science meets art: the curing process. It’s a step that can make or break your final product. You’ve designed a stunning graphic, printed it flawlessly on the film, and applied the adhesive powder perfectly. Now, all that stands between you and a vibrant, durable garment is a few seconds under the heat press. But this is where the magic, and potential mishaps, happen. Getting the cure just right is the key to creating DTF transfers that not only look incredible but also stand the test of time, wash after wash.
For creators, small business owners, and apparel decorators, understanding the nuances of curing is non-negotiable. An improperly cured transfer can lead to a host of problems: cracking, peeling, discoloration, or a stiff, unnatural feel. These issues not only ruin the garment but can also damage your brand's reputation. The two main culprits? Under-curing and over-curing. Each presents its own set of challenges, stemming from a misunderstanding of the delicate balance between time, temperature, and pressure.
This guide is your deep dive into the science behind it all. We'll move beyond simple instructions and explore the why—what’s actually happening to the ink and adhesive at a molecular level. We’ll break down the tell-tale signs of both under-curing and over-curing, provide you with the knowledge to diagnose problems, and equip you with troubleshooting techniques to achieve that perfect, professional-grade finish every single time. Here at DTF Dallas, we believe that an educated printer is a better printer, and we’re here to share our expertise to help you master this crucial stage. Let's unlock the secrets to a flawless cure.

The Core Science: What is "Curing" in DTF?
Before we can tackle the problems of under-curing and over-curing, it’s essential to understand what’s happening during the curing process. It’s more than just “melting the powder.” Curing is a chemical process that transforms the printed ink and adhesive powder into a single, flexible, and durable layer that will bond permanently with the fabric.
From Liquid Ink to a Solid, Washable Design
When you print your design onto the DTF film, you're laying down layers of specialized water-based pigment inks. While these inks are vibrant, they are essentially just liquid colorants suspended in a solution. On their own, they have no structure or durability. This is where the thermoplastic polyurethane (TPU) adhesive powder comes in.
The white powder you sprinkle over the wet ink is the bonding agent. It’s a type of polymer that, when heated, undergoes a process called polymerization. Think of it like a chain of individual molecules (monomers). When heat is applied, these monomers link together to form long, strong chains (polymers), creating a solid but flexible matrix.
The curing process has two primary goals:
- Gel the Ink and Adhesive Together: The initial heating stage is designed to melt the TPU powder and allow it to encapsulate the ink pigments. The heat evaporates the liquid carrier from the ink, and the molten adhesive fuses with the pigments. This creates a single, unified layer of color and glue on the film.
- Prepare for Fabric Adhesion: A properly cured transfer isn't fully hardened. It should be slightly pliable and "gelled," not completely melted into a liquid or scorched into a hard plastic. This semi-cured state is crucial because it ensures the adhesive is ready to be reactivated during the final heat press onto the garment, where it will flow into the fabric's fibers and create a permanent mechanical bond.
The Golden Triangle: Time, Temperature, and Pressure
Achieving a perfect cure relies on the precise control of three interconnected variables:
- Temperature: This is the most critical factor. The temperature needs to be high enough to initiate the polymerization of the TPU powder but not so high that it burns the ink pigments or the film itself. Different powders have different melting points, but most DTF curing happens in the range of 250-320°F (120-160°C).
- Time: The duration of heat exposure is just as important. Too little time, and the powder won't melt and bond with the ink completely. Too much time, and you risk over-curing, which we'll discuss in detail later. Curing times can range from a few seconds in a professional conveyor dryer to a couple of minutes under a heat press set to "hover."
- Pressure (during the final press): While pressure isn’t a factor in the initial curing of the powder on the film, it’s the final piece of the puzzle when transferring to the garment. The right pressure ensures the melted adhesive is forced deep into the fabric weave for maximum durability. We’re focusing on the initial powder cure here, but it's important to remember this final step.
Think of it like baking a cake. If the oven is too cold (low temperature), the center will be raw and gooey (under-cured). If the oven is too hot (high temperature) or you leave it in too long (time), the outside will burn while the inside might still be undercooked (over-cured and scorched). Achieving that perfect, golden-brown cake requires following the recipe—and in DTF, that "recipe" is the recommended settings for your specific ink, film, and powder. Understanding this science is the first step in troubleshooting any DTF printing problems you might encounter.
The Pitfall of "Not Enough": Identifying and Fixing Under-Cured Transfers
Under-curing is one of the most common issues faced by newcomers to DTF printing. It occurs when the adhesive powder has not been heated for long enough or at a high enough temperature to properly melt and fuse with the ink. The result is a weak, unstable transfer that is destined to fail.
The Telltale Signs of an Under-Cured Transfer
How can you spot an under-cured transfer? The signs are often apparent right after curing or, even more frustratingly, after the first wash.
1. A Powdery or Grainy Appearance
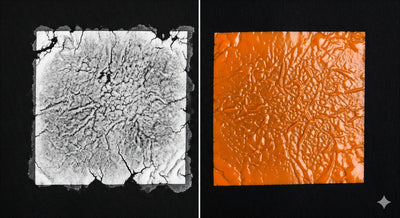
A perfectly cured transfer should have a smooth, slightly rubbery, or "orange peel" texture on the adhesive side. If you look closely at an under-cured transfer, you’ll still be able to see the individual grains of powder. It will look and feel sandy or gritty to the touch. This is a dead giveaway that the TPU granules never fully melted into a cohesive layer.
2. Poor Adhesion and Peeling Edges
This is where under-curing becomes a costly problem. When you press the transfer onto a garment, the partially melted adhesive doesn't have the ability to properly flow into the fabric fibers. The bond will be superficial and weak. The transfer might seem fine at first, but you'll likely notice the edges peeling up almost immediately after the press, or it may lift off entirely during the cold peel.
3. Cracking and Flaking After Washing
The ultimate test of a DTF transfer is its washability. An under-cured transfer will fail spectacularly in the wash. Because the ink and adhesive never formed a strong, flexible bond, the design will crack, flake, and wash away, sometimes on the very first cycle. The mechanical stress of the washing machine and the heat of the dryer will easily break the weak structure apart, leaving you with a ruined garment.
4. Dull or Patchy Colors
When the adhesive powder doesn’t gel correctly, it can’t properly encapsulate the ink pigments. This can result in a design that looks dull, faded, or even patchy. The vibrancy of the ink is compromised because it’s not sealed within a clear, protective adhesive layer.
What Causes Under-Curing? The Root of the Problem
Understanding the "why" helps prevent the problem from happening again.
- Temperature Too Low: Your heat source (whether a heat press in hover mode, a curing oven, or a conveyor dryer) is simply not hot enough to reach the melting point of your adhesive powder.
- Time Too Short: You might have the right temperature, but you're not giving the transfer enough time under the heat. The heat needs time to penetrate and evenly melt the entire layer of powder.
- Uneven Heat Distribution: This is a common issue with lower-quality heat presses. If your heating platen has cold spots, parts of your transfer will be perfectly cured while other areas remain under-cured, leading to patchy results.
How to Fix and Prevent Under-Curing
The good news is that under-curing is relatively easy to fix and prevent.
- Follow the Manufacturer's Guidelines: Your powder, ink, and film suppliers provide recommended curing temperatures and times. Start with these settings and adjust as needed. This is the most crucial step in mastering the heat press settings for DTF.
- Perform a "Gel" Test: Before pressing, check the adhesive side of the cured transfer. It should look like the skin of an orange—bumpy but unified. If you can still see powder, it needs more heat. Run your finger over it; if powder comes off, it’s definitely not ready.
- Increase Temperature or Time Incrementally: If you suspect under-curing, increase your curing time by 15-30 seconds or your temperature by 5-10 degrees and test again. Make small adjustments to avoid jumping straight to over-curing. Keep a log of what settings work best for your setup.
- Invest in a Quality Heat Press: A reliable heat press with even temperature distribution is a cornerstone of a good DTF workflow. Use an infrared (IR) temperature gun to check your platen for cold spots.
- Consider a Curing Oven or Conveyor Dryer: For higher volume production, a dedicated curing oven or a conveyor dryer provides much more consistent and even heating than a hovering heat press, significantly reducing the risk of under-curing and speeding up your workflow. The process of how to cure DTF powder is much more reliable with dedicated equipment.
By paying close attention to the texture of your cured adhesive and being methodical with your settings, you can eliminate under-curing and ensure your DTF transfers are built to last.
The Danger of "Too Much": Identifying and Fixing Over-Cured Transfers
While under-curing leads to a weak transfer, over-curing creates a different set of equally destructive problems. Over-curing happens when the transfer is exposed to excessive heat for too long. Instead of just gelling the ink and adhesive, the heat begins to break down the chemical compounds, effectively "cooking" the transfer until it becomes brittle and damaged.
The Telltale Signs of an Over-Cured Transfer
Over-cured transfers can sometimes be harder to spot than under-cured ones, as they might initially seem to adhere well. However, the damage is already done, and the look and feel will be compromised.
1. A "Plasticky" or Glossy Sheen
A perfectly cured transfer has a matte or satin finish after being pressed. An over-cured transfer, however, will often look overly shiny or glossy. The adhesive and ink have been heated past their melting point and have started to turn into a hard, plastic-like sheet. This not only looks cheap but also feels stiff and heavy on the garment.
2. Scorching and Discoloration
This is the most obvious sign. Excessive heat will literally burn the ink pigments and the TPU adhesive.
- White Inks Turn Yellow: White is particularly susceptible. An over-cured white design will take on a yellowish or brownish tint.
- Colors Become Muddy: Vibrant colors can become dull or "muddy" as the pigments are damaged.
- Film Discoloration: The DTF film itself might start to yellow or warp under extreme heat, which is a clear indicator that your settings are far too high.
3. Loss of Fine Detail
When the transfer is overheated, the ink and adhesive can melt excessively and bleed into one another. This causes fine lines to blur, small text to become unreadable, and intricate details to be lost. Your sharp, crisp design turns into a soft, slightly out-of-focus version of itself.
4. The "Oil Slick" Effect
Sometimes, over-curing can cause the chemicals in the ink and adhesive to separate slightly, creating an oily residue or a strange, iridescent sheen on the surface of the transfer. This is a sign that the chemical structure has been compromised. When pressed, this can lead to an uneven finish and poor durability.
What Causes Over-Curing? The Balancing Act Gone Wrong
Over-curing is a direct result of too much heat energy being applied to the transfer.
- Temperature Too High: This is the most common cause. Setting your heat press or oven well above the recommended temperature range will rapidly cook the transfer.
- Time Too Long: Even at a correct temperature, leaving the transfer under the heat for an extended period will eventually lead to over-curing. The heat energy accumulates, causing the same damage as an overly high temperature.
- "Hot Spots" on Equipment: Just as cold spots cause under-curing, "hot spots" on a low-quality heat press platen can over-cure certain areas of your design, leading to inconsistent results across a single transfer.
How to Fix and Prevent Over-Curing
Unfortunately, once a transfer is over-cured, it cannot be saved. The chemical damage is irreversible. The focus, therefore, must be entirely on prevention.
- Calibrate Your Equipment: Don't trust the digital readout on your heat press. Use an IR temperature gun to measure the actual surface temperature of your platen. It’s common for a press's display to be off by 10, 20, or even 30 degrees.
- Start Low and Go Slow: Begin with the lowest recommended temperature and time settings from your supplier. It’s always better to have a slightly under-cured test print that you can add more time to than an over-cured one that has to be thrown away.
- Create a Test Sheet: Use a "gang sheet" with several small, identical designs. Cure and press them one by one, adjusting the settings for each. Keep the one with the best look, feel, and stretch. Label it with the settings you used and keep it as a physical reference. This is a vital part of perfecting your DTF transfer application.
- Understand Your Materials: Different powders (fine, medium, coarse) and inks may have slightly different optimal curing parameters. If you switch suppliers or materials, you must re-test your settings. Don't assume the old settings will work.
- Ensure Proper Ventilation: While not directly related to the cure quality, proper ventilation is crucial for safety. The fumes released during curing can be harmful, and good airflow can also help regulate temperature consistency around your curing station.
By treating the curing process with precision and care, you can avoid the costly and frustrating issue of over-curing, ensuring every transfer you produce has the professional quality your customers expect from a top-tier provider like DTF Dallas.
Achieving the "Perfect Cure": A Step-by-Step Guide and Best Practices
Now that you can identify the two extremes, let’s focus on the sweet spot: the perfect cure. A perfectly cured DTF transfer is the gold standard—it’s vibrant, durable, flexible, and feels soft to the touch on the garment. It represents the successful fusion of your materials and technique.
Characteristics of a Perfectly Cured Transfer
- Texture: Before pressing, the adhesive side should have a uniform "orange peel" texture. It should feel slightly rubbery, not powdery (under-cured) or hard and slick (over-cured).
- Appearance: The colors on the film are bright and true to the original design. There is no yellowing, scorching, or oily sheen.
- Flexibility: The transfer is pliable and can be bent slightly without cracking.
- Adhesion: After pressing and peeling, the transfer is fully bonded to the garment. The edges are secure, and you can see the texture of the fabric slightly through the design, indicating the adhesive has properly flowed into the fibers.
- Stretch and Rebound: When the garment is stretched, the transfer stretches with it without cracking. When released, it rebounds back to its original shape.
- Wash-Resistance: It endures multiple wash cycles without peeling, cracking, or fading.
Your Workflow for Consistent, Perfect Cures
Consistency is the key to professional results. Developing a repeatable workflow will help you nail the cure every time.
Step 1: Environment and Preparation
Ensure your workspace is clean. Dust or debris on the wet ink before powdering can interfere with the cure. Use a hygrometer to monitor humidity; very high humidity can affect ink drying times and may require slight adjustments to your curing process.
Step 2: Calibrate Your Equipment
As mentioned before, this is non-negotiable. Use an IR temp gun to verify the temperature of your heat press platen or curing oven. Know your equipment's true temperature. A press set to 300°F might actually be running at 280°F or 320°F. This knowledge is power.
Step 3: Start with a Baseline
Consult the technical data sheet for your specific DTF powder and inks. A typical starting point for curing is around 280-310°F (137-155°C). The method of heating determines the time:
- Heat Press (Hover Method): Hover the platen about half an inch above the transfer. This can take anywhere from 1 to 4 minutes, depending on the temperature and size of the design. Watch for the visual change from powder to gel.
- Curing Oven: These provide enclosed, even heat. A typical cycle might be 2-3 minutes.
- Conveyor Dryer: This is the most efficient method for high volume. The transfer moves along a belt under heating elements. Time is controlled by the belt speed, often taking 45-90 seconds to pass through.
Step 4: The Visual Test (The Most Important Step)
No matter what the timer says, your eyes are the best tool. Watch the transfer as it heats. You will see a distinct transformation:
- The loose white powder will begin to look "wet" as it starts to melt.
- It will then transform from a grainy texture to a glossy, liquid-like state.
- Finally, as it fully cures, the high gloss will slightly subside into a unified, bumpy, "orange peel" texture. This is the moment it’s done. Once the entire design has reached this state, remove the heat.
Step 5: Document and Repeat
Once you find the perfect combination of time and temperature for your setup that yields a perfect visual cure, write it down! Log the type of film, powder, ink, temperature, and time. This documentation is your recipe for success and will save you immense time and materials in the future.

Pro-Tips from the Experts at DTF Dallas
- Pre-Press the Garment: Always pre-press your shirt for 5-10 seconds before applying the transfer. This removes moisture and wrinkles from the fabric, ensuring a better bond.
- Use a Teflon Sheet or Parchment Paper: During the final press onto the garment, use a protective sheet. This prevents direct contact between the heat platen and the transfer, distributing heat more evenly and preventing scorching.
- Second Press for Durability: After the cold peel, many professionals perform a second press for 2-5 seconds with a protective sheet. This helps to further embed the transfer into the fabric, improving washability and giving it a softer, more matte finish.
- Let It Cool Completely (Cold Peel): Unless you are using a specific hot-peel film, patience is a virtue. Let the transfer cool completely to room temperature before peeling the film away. Peeling too early can lift the transfer or ruin the finish.
Mastering the art of curing DTF transfers is a journey of precision and observation. By understanding the science, recognizing the signs of improper curing, and developing a consistent workflow, you can move from guesswork to confidence, producing flawless, durable, and professional-quality custom apparel every single time.
Frequently Asked Questions about Curing DTF Transfers
-
Q: Can I use a hairdryer or heat gun to cure my DTF transfers?
- A: While technically possible for a small hobbyist project, it is highly discouraged for any professional or commercial use. Heat guns and hairdryers provide inconsistent and uneven heat, making it nearly impossible to achieve a proper cure across the entire design. You will almost certainly have under-cured and over-cured spots on the same transfer, leading to failure. A heat press (in hover mode) is the minimum recommended equipment.
-
Q: Why does my white ink look yellow after curing?
- A: This is a classic sign of over-curing. The temperature is too high or the curing time is too long, causing the white ink pigments to scorch. Reduce your temperature by 10-15°F or shorten your curing time and test again. Also, ensure you are using a high-quality white ink, as lower-quality inks can be more susceptible to discoloration.
-
Q: What does the "orange peel" texture everyone talks about actually look like?
- A: Imagine the surface of an actual orange—it's not perfectly smooth, but rather has very fine, uniform bumps and dimples. A perfectly gelled DTF adhesive layer looks just like that. It signifies that all the individual powder granules have melted and fused into a single, cohesive sheet without being overheated to a flat, glossy liquid.
-
Q: My transfers are cracking after just one wash. What am I doing wrong?
- A: Cracking after washing is the most common symptom of an under-cured transfer. The adhesive powder did not fully melt and bond with the ink, creating a brittle layer that breaks apart under the stress of washing. You need to increase your curing time or temperature. Perform a visual gel test before pressing to ensure the adhesive is properly melted.
-
Q: Is there a difference between curing the powder and pressing the transfer onto the shirt?
- A: Yes, they are two distinct steps. Curing (or gelling) is the process of melting the adhesive powder onto the printed ink on the film. This is typically done without pressure (e.g., hovering press, oven). Pressing is the final step where the cured transfer is applied to the garment using firm pressure and heat to activate the adhesive and bond it permanently to the fabric. Both steps require precise settings.
-
Q: How do I know if I have a "cold spot" on my heat press?
- A: The best way is to use an infrared (IR) temperature gun. Heat your press to its target temperature, then measure the temperature at various points on the platen—the center, all four corners, and the edges. If you see significant temperature variations (more than 5-10 degrees), you have cold or hot spots that will affect your curing consistency.
Ready for Flawless Results? Let DTF Dallas Help!
Tired of the guesswork? Ready to produce consistently vibrant, durable, and professional-grade apparel? The quality of your materials matters just as much as your technique.
At DTF Dallas, we provide premium, ready-to-press DTF transfers that take the hassle out of your production. Our transfers are made using state-of-the-art equipment and perfectly calibrated processes, ensuring a flawless cure every time. All you have to do is press.
Comments 0
Be the first to leave a comment.


